|
Happy March everyone! I cannot believe that we're already in the 3rd month of 2016. This month I am participating in a project/challenge called March Market Medley! The hastag under the same name, #marchmarketmedley was co-created by @stephaniefehrenbach and @jenmanship on instagram. They both do beautiful watercolor work and I definitely recommend checking them out.
Strawberry Pattern 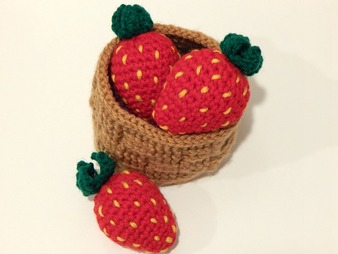 Materials Stitches Yarn - worsted weight Chain (ch) Red Single Crochet (sc) Green Half Double Crochet (hdc) Yellow Double Crochet (dc) F Hook Slip Stitch Scissors Tapestry Needle Poly-fiber Fill Strawberry Body - with F hook and Red yarn Make magic ring 1. Sc 5 into magic ring. 2. 2 sc into each stitch around (10) 3. Sc around (10) 4. *Sc 1, 2 sc in next stitch* repeat around (15) 5. Sc around (15) 6. *Sc 2, 2 sc in next stitch* repeat around (20) 7. Sc around (20) 8. *Sc 3, 2 sc in next stitch* repeat around (25) 9.-11. Sc around (25) 12.* Sc 3, decrease* repeat around (20) Begin stuffing 13. *Sc 2, decrease* repeat around (15) 14. *Sc 1, decrease* repeat around (10) 15. Decrease around (5) F/O Leaves -with F hook and Green yarn Make magic ring (be sure to leave a long tail for stitching on the leaves) 1. Sc 5 into magic ring 2. 2 Sc into each stitch around (10) 3. Slip stitch into next stitch and then chain 5. Slip stitch into second loop from chain, sc in next, then hdc, and dc into final stitch. Slip stitch into next stitch, repeat 4 more times. F/O Assembly Attach leaves to top of strawberry using the long tail from making the magic loop. Take yellow yarn and stitch on "seeds" as evenly as possible around the strawberry body. Voila, you're done! You now can make a whole basket full of luscious strawberries.
0 Comments
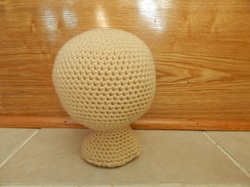 Hey All! I'm popping by today to share something fun I whipped up the other day. It'll really help with photographs and listing items in the shop. If you follow the goings on in the shop, you'll notice that a majority of my listed products are shoes or hand warmers. Both are fairly easy to photograph by themselves, or with the hand warmers, slip on the hand for an idea of what it would look like worn. What I don't have listed are my headbands and hats! I don't feel that laying them flat worked well, I hate the look of styrofoam head forms, and of course I don't have any children myself at the moment! Nor do I have any near by that I can borrow. I followed Erica's pattern from her blog Five Little Monsters. The one I whipped up was the 3-6 month form, but I find that it does alright with setting 1-2 year hats on as well. I made sure to stuff the top head well so that it nicely keeps its shape. The neck part lifts the head portion off the surface to have a better look at the product being displayed. I LOVED how it turned out. Simple and does the job. With that done, keep your eyes peeled for a few headbands to pop up in the shop! Here's a little preview of my Brown Eyed Susan headband. 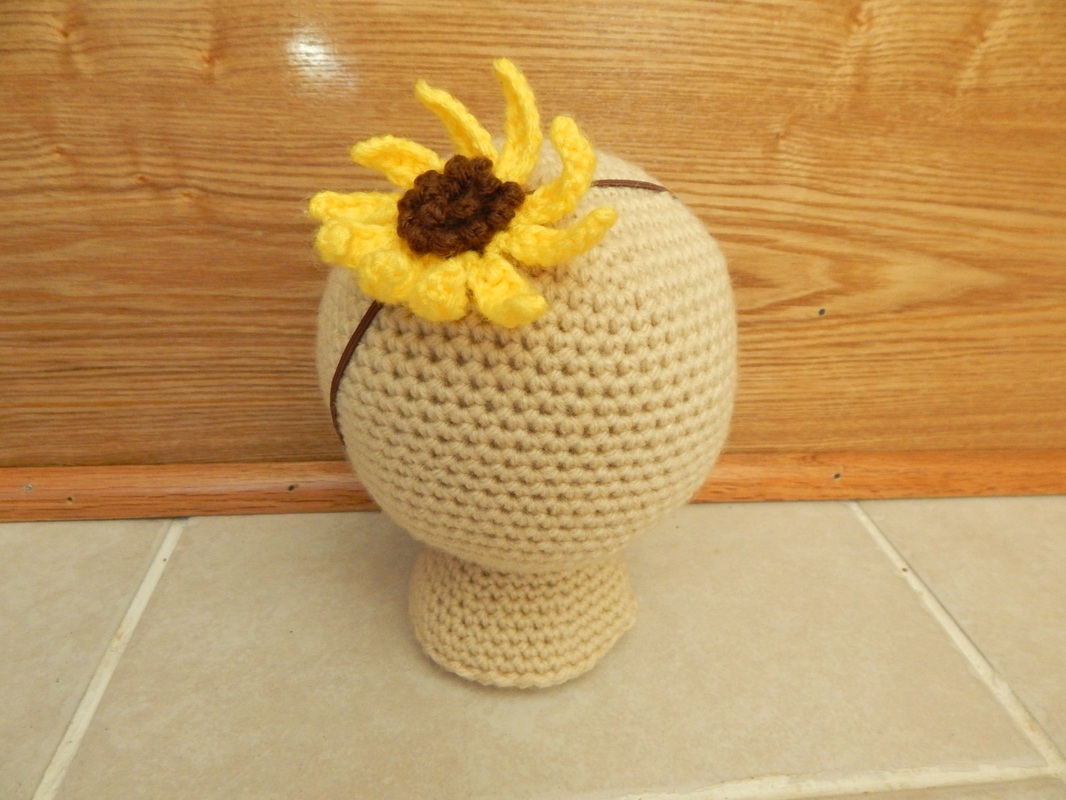 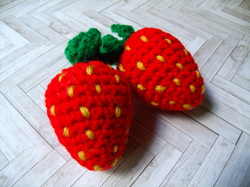 It's officially strawberry season here! That means I get to pair strawberries with all sorts of foods with our meals. Breakfast, dinner, and supper -- strawberries will be there. As the harvest increases, I will also be preserving, freezing, and dehydrating our little red gems. Strawberries also mean inspiration! So, I crocheted up a few lovely strawberries in celebration of the crop harvest. I based them off of the light bulbs I do for Christmas, added yellow yarn for seeds, and a small green topper of leaves. I've only made up a small batch with a basket that I'll have for sale at the Rhubarb Festival on June 6th. Later on I may offer the pattern to you as well. :) For now, I'm busy preparing myself for the next show. Enjoy the eye candy! 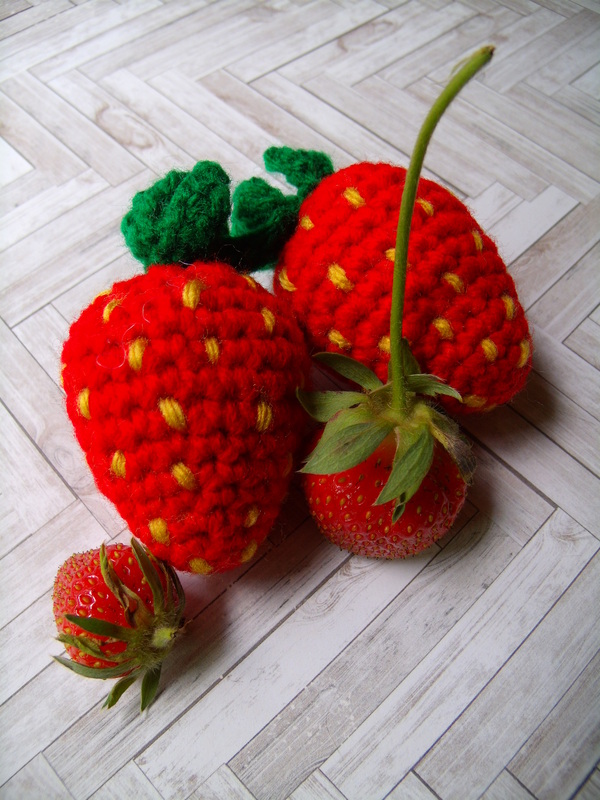 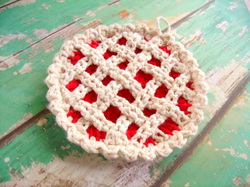 Hi All! I just wanted to quickly share a new product that I'm making especially for a craft show I'll be doing on June 6th. The show is at the 26th Annual Aledo (IL) Rhubarb Festival! So, I thought I'd make a special item to go with the rhubarb theme. At first I thought, 'Oh, it would be cool to crochet some actual stocks of rhubarb.' Then, I decided that was a bit too much work in pattern design. Instead, I modified a hot pad pattern to turn it into a rhubarb pie! I'll have two color variations. The one shown is a red filling, so I figured I'd call it 'Strawberry Rhubarb' and I will also be doing a light pink filling which will be plain 'Rhubarb.' Pretty cool, huh? These hot pads are made with 100% cotton and measure 5 inches in diameter. I attached a loop so that you can hang it up in the kitchen for decor or easy storage. This pie hot pad is definitely a great one! I love the way it turned out and hope you do, too. If you'd like one, come on over to the Aledo Rhubarb Festival on June 6th in Aledo, IL or special order one, since they won't be in shop due to being a special item. 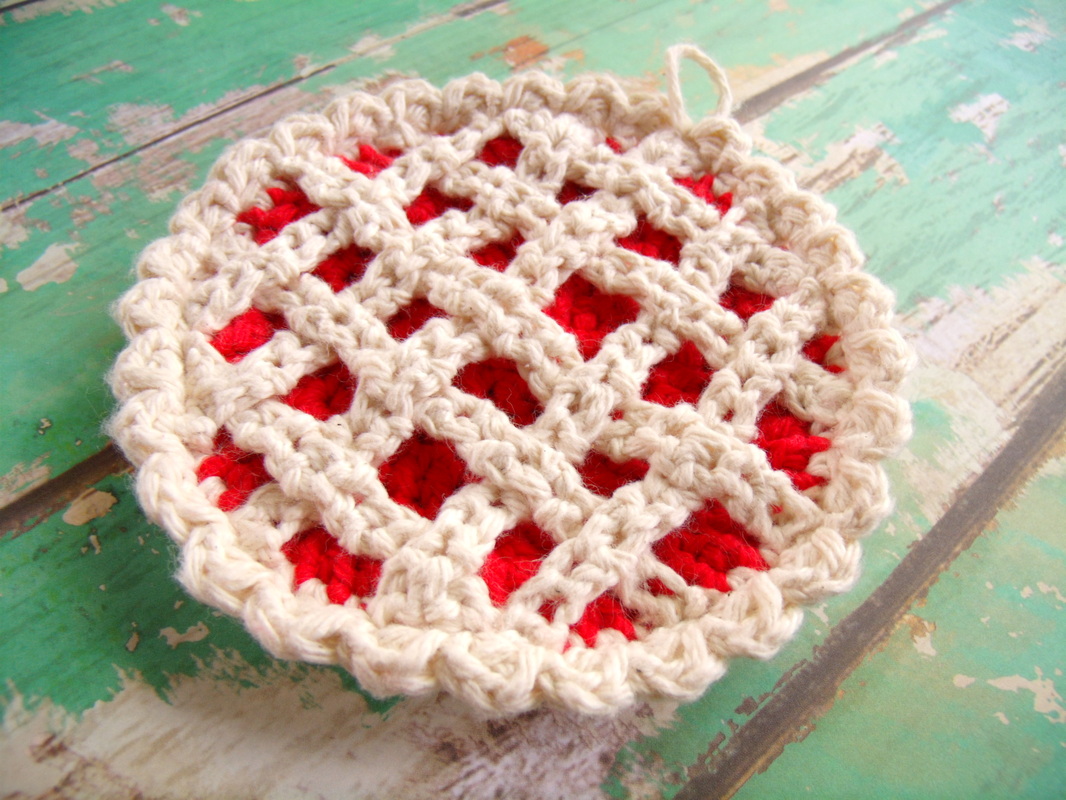
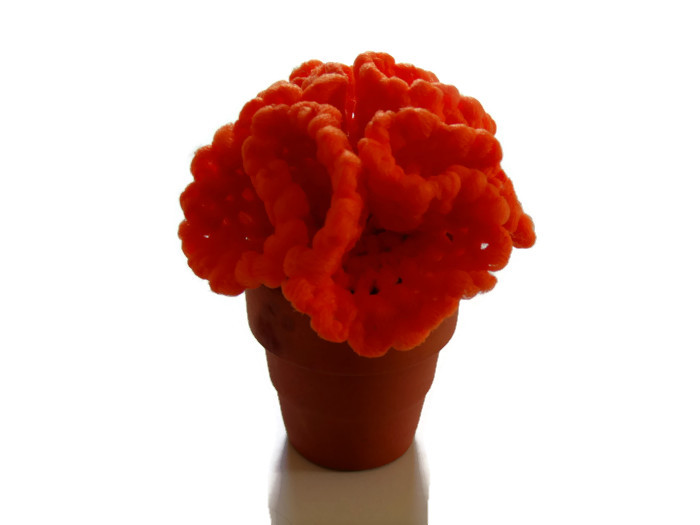
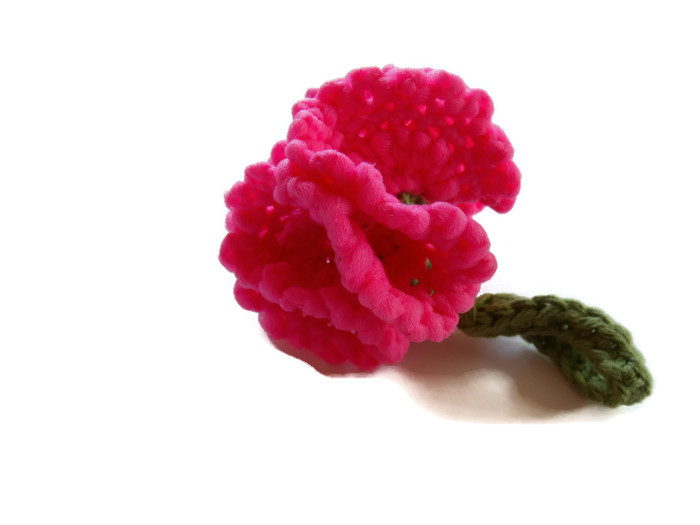
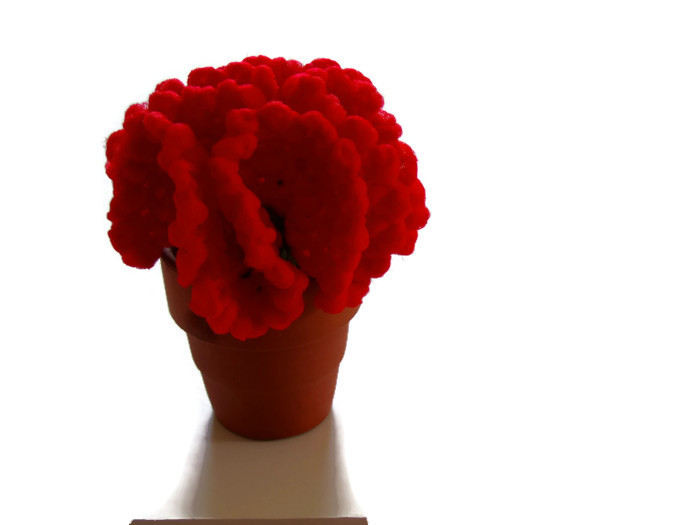
Hey, all! It's my Birthday!! Yeah, I'm pretty darn excited and you should be, too. Why? Because I have an awesome virtual party favor for you that you're going to love. Like all my free patterns, they're pretty simple and always cute. Today's free pattern is a crochet Birthday Cake! I can't share an edible cake with you on the internet, but I certainly can show you how I crocheted my own little cake that you can use as well. The cake is small which gives it many uses. You can use it as a present topper/decor much like a bow, crochet several up for actual party favors, make one as a play item for children (tea party anyone?), or as an adorable photo prop. Birthday Cake Pattern 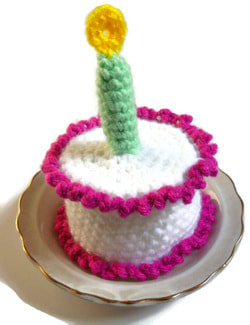 Materials: Stitches: Yarn - 3 colors of choice + yellow Chain (ch) Hook - G and E Slip stitch Scissors Single Crochet (sc) Tapestry Needle Half Double Crochet (hdc) Double Crochet (dc) Treble Crochet (tc) Cake - with G hook. in choice of cake color/flavor Make a magic ring 1. Sc 7 into magic ring 2. 2 sc in each stitch around (14) 3. *1 sc, 2 sc in next* around (21) 4. *2 sc in next 2 stitches, 2 sc in one* around (28) 5. *2 sc in next 3 stitches, 2 sc in one* around (35) 6. HDC around (35) 7. Sc around in back two loops of hdc. 8-15. Sc around fasten off Icing Top Attach second color yarn (icing color) to remaining loop of hdc on top of cake. *Chain 2, slip stitch into same stitch, slip stitch into next stitch* repeat around Fasten off Icing Bottom Attach same icing color to front loop on the bottom of the cake. *Chain 2, slip stitch into next stitch* repeat around Fasten off Candle - with E hook, in third color Make magic ring 1. Sc 4 into magic ring 2. 2 sc in each stitch around (8) 3-9. sc around fasten off Flame - in yellow Make magic ring 1. Into magic ring: sc, hdc, dc, tc, dc, hdc, sc, sc, sc. Pull loop tight. Fasten off Finishing: Complete the cake by stitching flame to top of candle and completed candle to the top middle of the cake. Voila! You now have a sweet little birthday cake for you to enjoy! I'd like to introduce you to a new product that just bloomed into the shop, adding to the beautiful garden I've created for you to use in household items. :) I've been really excited about this one! It's always a wonderful feeling completing a new pattern that works and resembles my vision. The new items are these beautiful little carnations pictured below. While they're very pretty, they also have a purpose. The bloom is crocheted with nylon netting which, like in the spiral scrubbies, allow you to remove heavy dirt from dishes to the counter. Attached to the bloom is a cotton bud with strap attached. I added the strap so that you can hang up your carnation to dry or store. The whole product works really well and I enjoy them in my kitchen! I hope you will, too.
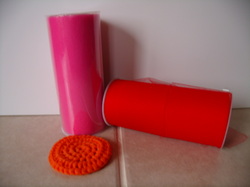 Ever want to make your own scouring pads? Well, it's pretty simple to do if you use tulle as the yarn. What is tulle? It's a thin, netting like cloth that is most commonly used for veils, evening dresses, tu-tus, and even wreaths! It can be found at craft or fabric stores in 6 inch spools that typically have 25 yards of cloth. I can find mine for $3 a spool, but prices may differ in your area. The first time I used tulle I used the entire six inch wide piece. Well, that didn't go over very well. My project was bulkier than I preferred and it was hard to work with. So, I decided to cut the spool in half. Best idea ever! Once I had half the width to work with I could make smaller stitches and get my project the size and shape I wanted. To cut the spool in half, you will need a very sharp knife. Tape the loose piece down on both sides, so that it doesn't start to unfurl and get in the way. Then you carefully cut through the tulle with your knife all the way around. Be sure to cut all the way to the cardboard spool. Your results will look like this: 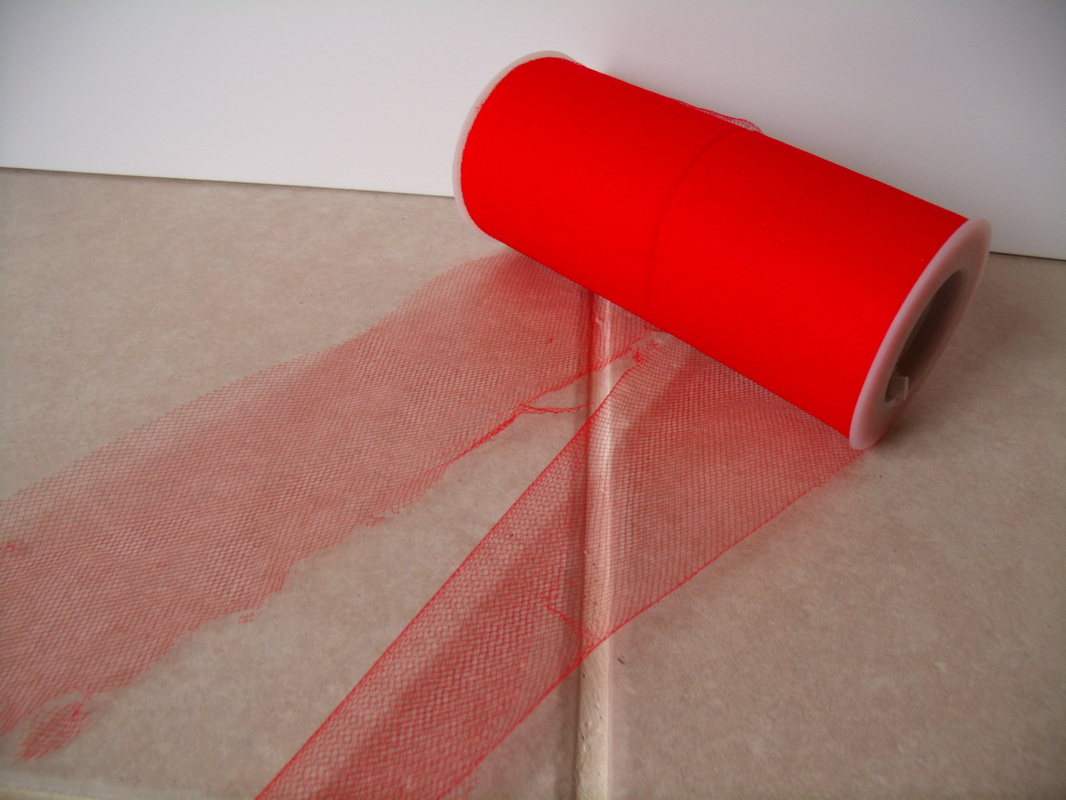
It doesn't really matter if your cut edge was completely straight or clean as long as you cut it in half. :) When you work with the tulle to crochet or knit the tulle will be wrapped up in a sort of thread and the uneven edges won't show! Now for the pattern! This pattern is a simple crochet scouring pad that I really love. It has a neat raised spiral on one side that is really good for scrubbing. Spiral Scouring Pad 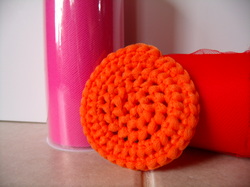 Materials: Stitches:
1 Spool of Tulle Magic Loop Hook - H Chain Scissors Slip Stitch Tapestry Needle Single Crochet Half Double Crochet (hdc) *Note: In this pattern, you will crochet in the back two loops of the hdc's* Pattern: 1. Make a magic loop, ch 1 and hdc 6 times into the loop. Pull loop closed. (6) 2. 2 hdc into each stitch around (12) 3. 1 hdc in one, 2 hdc in next* repeat around ( 18) 4. 2 hdc in each stitch around (32) 5. Single crochet around, slip stitch into next stitch. (32) 6. Bind off remaining thread. This past weekend my hubby and I were invited to a wedding. Our first one out of four that we know of for the year! The gift we came up with was for me to make a crochet name filet with their family name. My Great Aunt Grace did this for a lot of the family, so I thought it would be a cool thing for me to start doing as well. The filet was my first one, so I was pretty darn excited to make it! Part finishing these projects require blocking. If you don't know, blocking is a method using water (vapor or liquid) to set a piece into the shape you want. It also relaxes the stitches which can even out the look of stitches if they're not quite even in tension. My requirement for blocking was to relax the piece (it was a bit wavy) and to set the edge design in place (it was twisting/curling a bit so that all the end loops weren't visible). You can see the finished product before blocking below. (Please pardon the quality of photos, I was in a hurry to get the project finished and didn't have a lot of time to spend on photo taking) 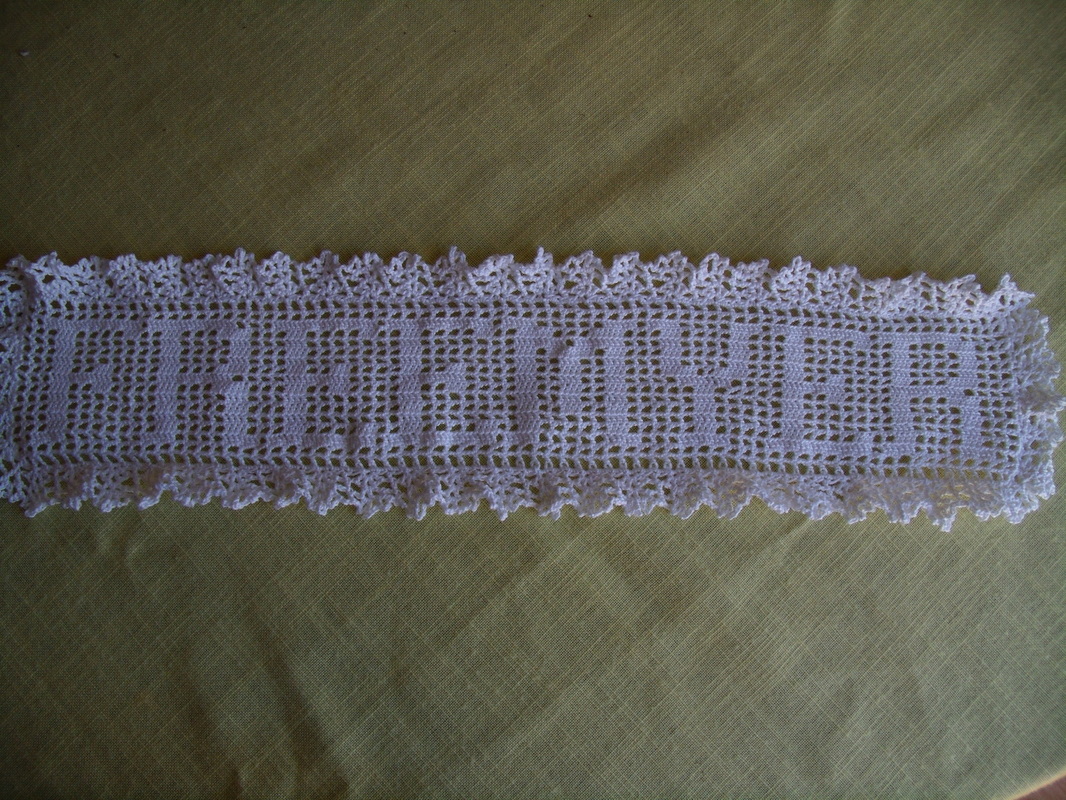
The method of blocking I used was wet blocking. In this method you saturate the piece with water and usually a gentle detergent/soap, wring or pat out excess water, and lay it flat to dry with the piece pinned to the shape you want. Below I have my filet ready to put into the prepared soap water. 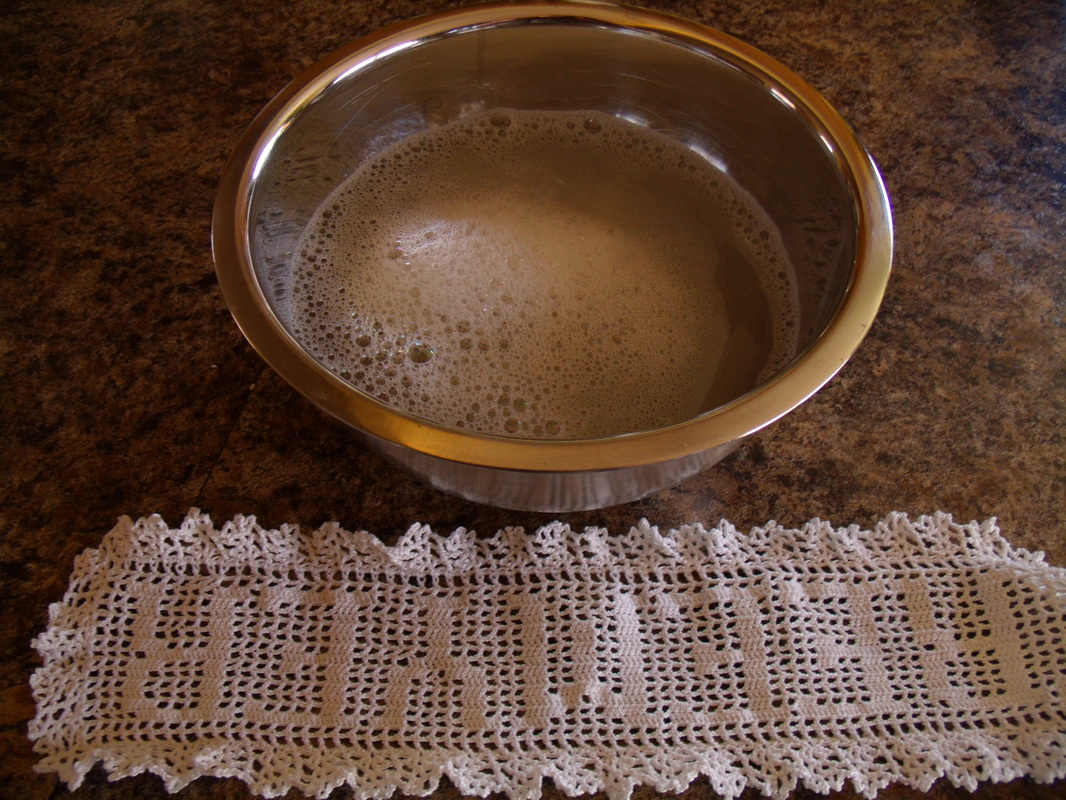
Next, I submerged the filet in the soap water, making sure it got entirely wet. I then let the piece sit in the water for at least an hour. You probably could do less, but I like to say at least an our because then I have time to get the next step prepared and maybe a load of laundry. ;) 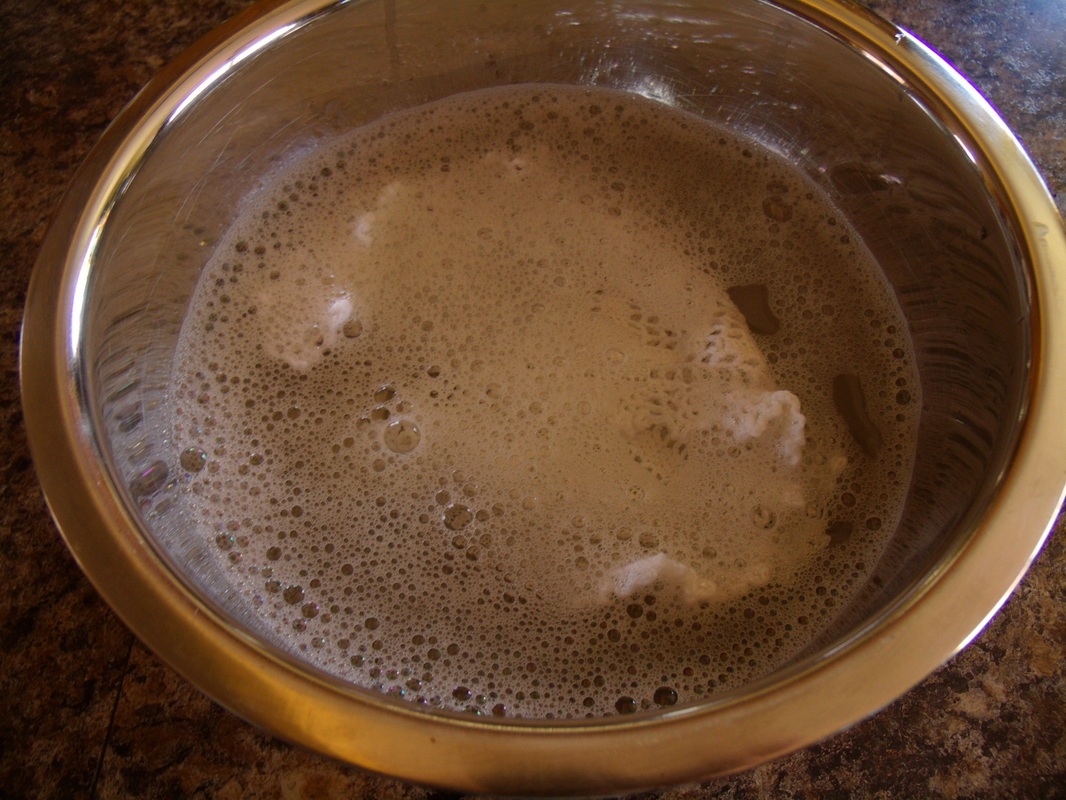
After the hour (or your allotted time) has passed, I wrung out the filet and gently patted out excess water with a dry towel. Sorry, I don't have a picture of that! Then I laid the filet out on something I could stick pins into. I used my cushioned quilt block cut and press pad, but you could also use a towel, piece of foam, or whatever works for you. I stretched the piece the long way and short way to make the piece a little bigger and stretch the stitches apart a bit. Finally, I pinned the outer edge in place to the way I wanted it to look. The main purpose was to get the decorative loops to sit nicely and visibly, but also to make sure the piece stayed in the right shape while drying. 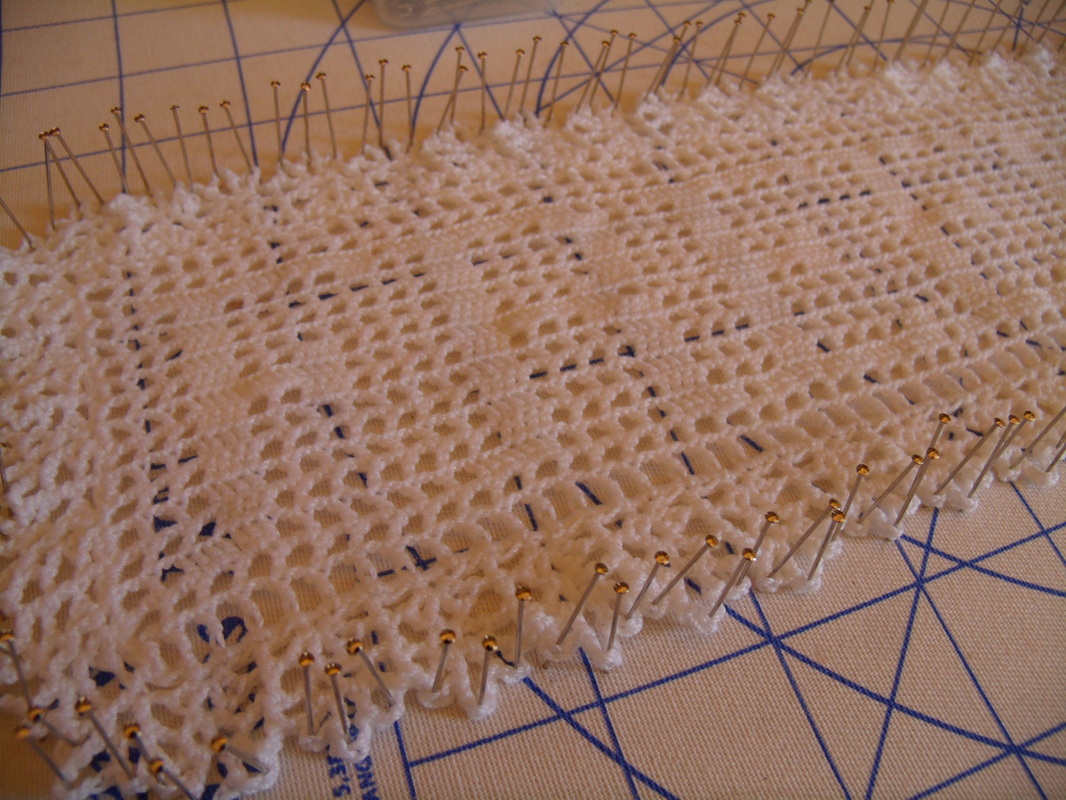
Here's the finished product! It turned out really well for my first name filet. I hope the couple appreciate this gift and mount it in their home. I hope you, too, find this tutorial helpful! It's pretty basic and easy, but if you have any questions or comments, please share! 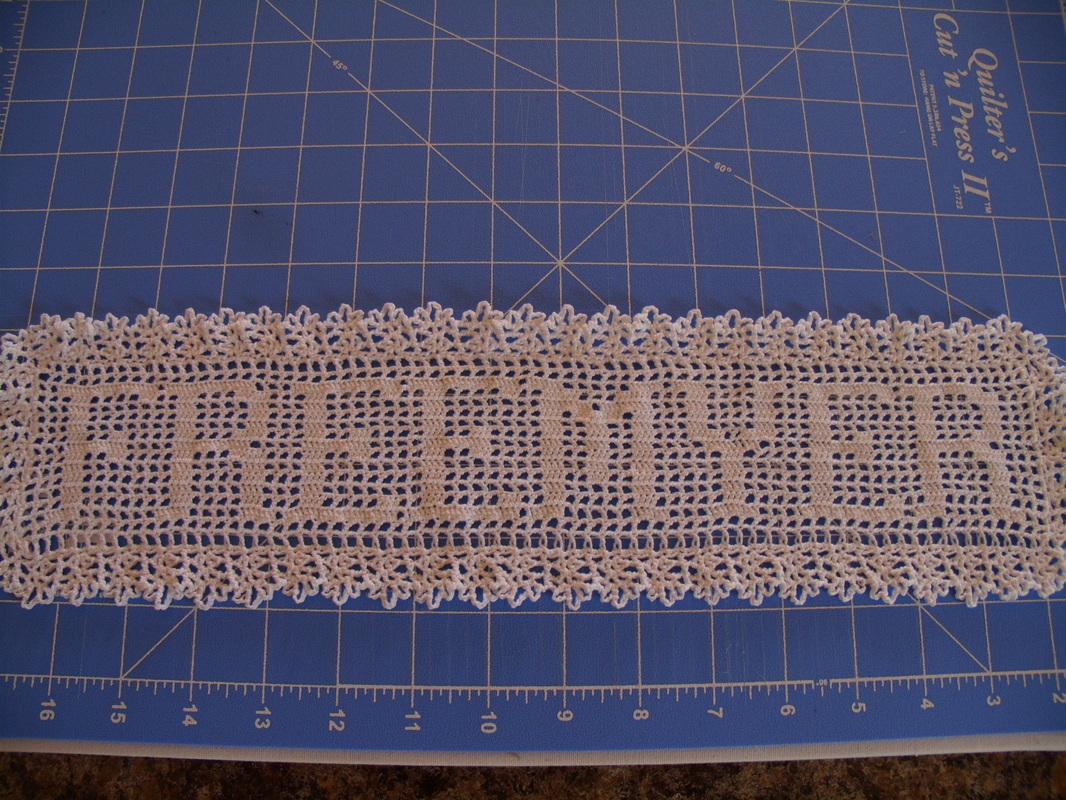
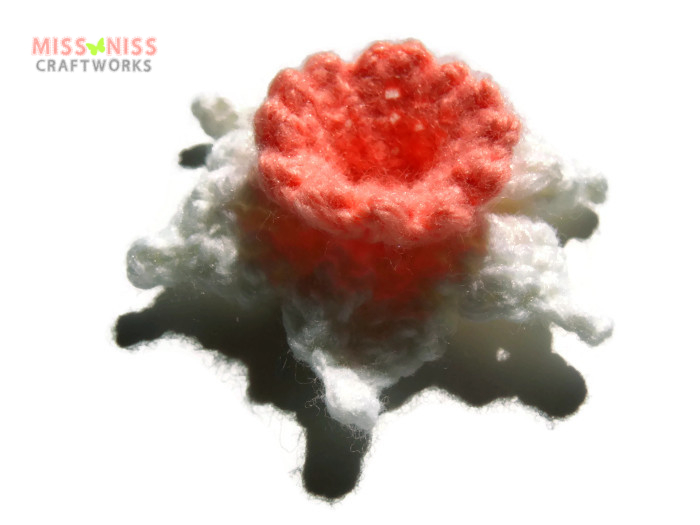
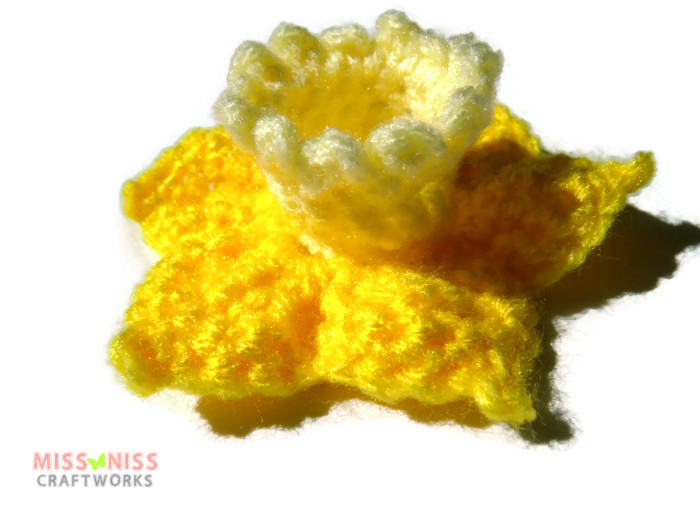
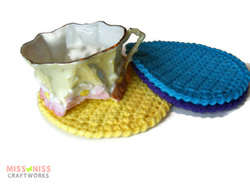 I would love for this to become a regular thing! I have been heavily considering writing and selling patterns. I have a few hand and wrist pains that show up now and then, so patterns could alleviate my work load and also offer an income. AND with today's DIY mentality, I think patterns would be quite popular! However, I don't think it's completely fair to sell simple patterns that you yourself would be able the figure out in a heartbeat if you tried. So, I want to try to offer some easy patterns to you for free! You've already gotten my lovely daffy, now you'll have my sweet egg coasters as well! *I do have to note, I do sell some of these finished products in shop. So, if you don't have the time or are just here to ogle, pop on over to the shop and purchase what you want!* This pattern I'm sharing with you today is really easy to whip up. It's cute, and you can use a variety of colors for that fun Easter egg look! Easter Egg Coaster 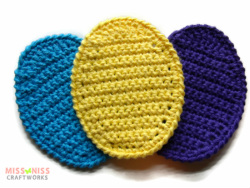 Materials: Stitches: Yarn - worsted weight cotton Chain (ch) Hook - G Single Crochet (sc) Scissors Single Crochet 2 together (sc2tog) Tapestry Needle Double Crochet (dc) Treble Crochet (tc) Chain 9 1. Sc in second chain, sc across. (8) 2. Ch 1, 2 sc in first st, sc 6, 2 sc in last st. (10) 3. Ch 1, 2 sc in first st, sc 8, 2 sc in last st. (12) 4. Ch 1, sc across 5. Ch 1, 2 sc in first st, sc 10, 2 sc in last st. (14) 6-12. Ch 1, sc across 13. Ch 1, sc2tog, sc across (13) 14. Ch 1, sc2tog, sc across (12) 15. Ch 1, sc2tog, sc 8, sc2tog (10) 16. Ch1, sc2tog, sc 6, sc2tog (8) 17. Ch 1, sc2tog, dc, in same stitch dc then tc, in same stitch tc then dc, dc, sc2tog 18. Sc around the edge of coaster gaps left by the rows. Start from where you ended last row, down the left side, and around. 19. Cut long tail and whip stitch around the egg in the single crochets. This gives you the twisted edge look. 20. Weave in loose ends and you're done! *Make 4 for a set* 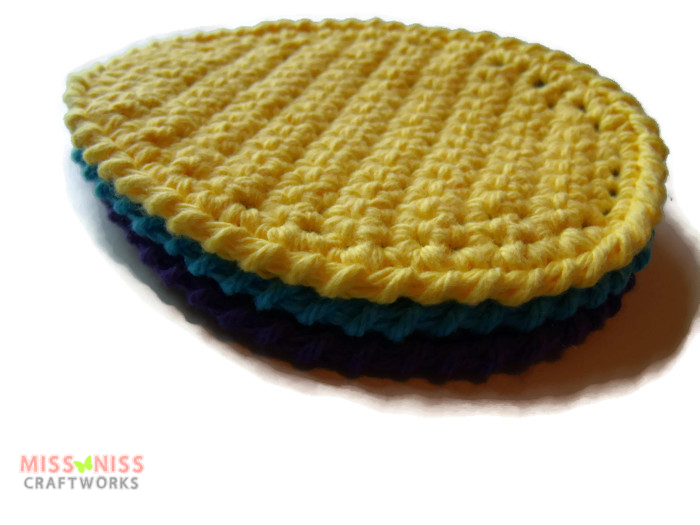  I don't know about you, but it's definitely feeling 'Spring-y' around here! The sun is out, the snow is melting, birds are beginning their mating songs, and critters are waking up from winter slumbers. My husband and I often contemplate our favorite time of the year. His is fall; with the yummy goods from harvest, warm colors, and brisk air who's to complain? Not I. However, I wouldn't say it's my favorite time of the year. Mine has to be spring. I may be a little biased, being a May baby and all, but hey so is my husband! No, it's not just the joy and memories of spring birthday celebrations that make me love spring. It's all the magic that happens during this time. If you've read The Secret Garden, you'd understand the illustration of spring as a season with immense magic. In reality, it's probably the new life appearing in spring that gives the feeling of magic. So much more energy flowing around. So, in homage to another Spring I have made up a few daffodils. Or daffydowndillies as they're called in Burnett's book. I'm not sure what I will do with them, yet. Maybe spring ornaments or I may make a garland. Attach them to a stem and place them in a vase or pin to a hat. Many possibilities with these cute Daffodils!
Basic Daffodil Pattern 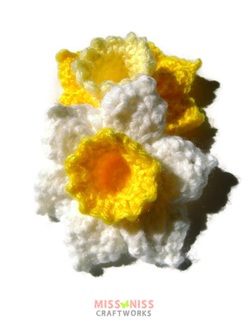 Materials:
Yarn - Worsted Weight, any 1-2 colors you want Hook - F and H Scissors Tapestry Needle Stitches: Ch - Chain Sl. St. - Slip stitch SC - Single Crochet HDC (half double crochet)- Wrap yarn over hook, insert hook into stitch, pull yarn through stitch (you'll now have 3 loops on hook), wrap yarn over and pull through all three loops. TR (treble crochet)- Wrap yarn over hook twice, insert hook into stitch, pull yarn through stitch (you'll have 4 loops on hook), wrap yarn over and pull through two loops, do final step two more times. DTR (double treble crochet)- Wrap yarn over hook three times, insert hook into stitch, pull yarn through stitch (you'll have 5 loops on hook), wrap yarn over and pull through two loops, do final step three more times. Picot - Ch. 2, slip stitch into first chain. f/o- Fasten off Center: with F hook and Color 1 1. Ch. 4, sl. st. into first chain to make a round. 2. Ch 2. (this is your first HDC), HDC 11 into ring, sl. st. to Ch. 2 (12) 3. Ch. 1, SC around in back two loops of HDC, sl. st. into ch 1. (12) 4-5. Repeat step 3. 6. Ch. 2, SC in same st. as sl. st. *Ch. 2, SC in next st.* around. f/o Petals: with H hook and Color 2 (or 1 if doing single color daffodil) 1. Join Color 2 to any of the remaining loops from HDC with a SC. 2. *Ch. 2 skip stitch SC in next stitch* around, sl. st. to first SC (6 ch. 2 spaces) 3. Sl. St. in first Ch. 2 space *Ch. 2, TR, 3 DTR, TR, Ch. 2, SC, Sl. St. into next Ch. 2 space* around 4. *2 SC in Ch. 2 space, SC in next 2 st, SC Picot SC in next st., SC in next 2 st, 2 SC in Ch. 2 space* around, f/0 Tie in loose ends, cinch center of daffodil closed for a better looking flower. |
Author
My name is Annissa, owner of MissNissDesigns. I am a knitter, crocheter, sewer, and all around crafty lady. Archives
April 2023

|