|
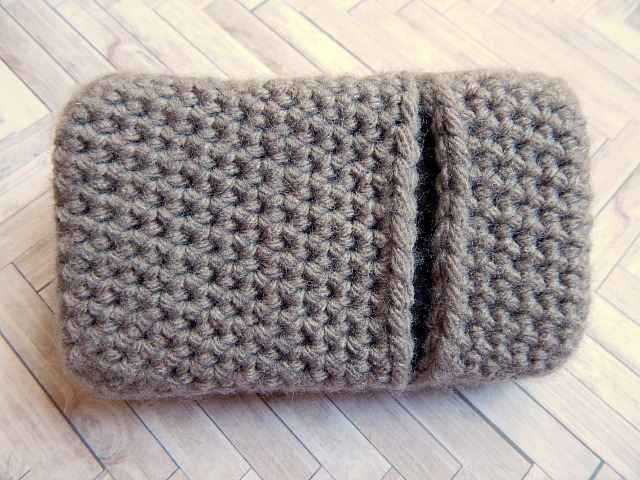
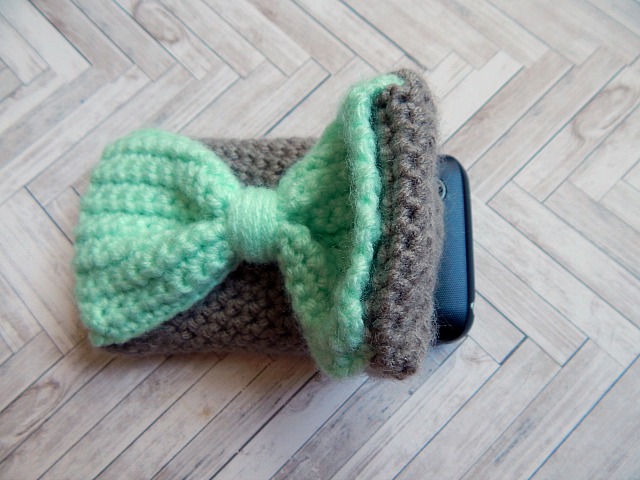
I just got a new phone. Ehem, I mean I just got my FIRST smartphone. In my household we use tracfone for cell coverage, since paying astronomical monthly bills really didn't make sense for our phone usage. However, my previous phone was starting to have coverage issues. When visiting MN it completely locked up and I wasn't able to use it at all. Okay, a $10 phone probably wasn't the best choice in the long run. It suited me well for almost two years, so I guess this upgrade wasn't so bad. The reasons I chose a smartphone instead of a similar one to the previous are: 1. I didn't want to have a coverage problem again. 2. A smartphone would allow me to use gps, internet, and lots of other goodies! 3. It's also an MP3 player (my other one accidentally went through the wash :( ...a long time ago). 4. The phone I chose had great reviews AND it was cheaper because of a promotion package. One concert I have is protecting the screen if I were to put it in my purse on my way out. I didn't want to pay for a plastic case that I know I wouldn't like. So, of course I crocheted a cute one up for myself! It is super adorable and I hope you like it, too! Here's the pattern, which is easy adjustable to your own phone size. Bow Cell Phone Case  Materials Stitches Gray worsted weight yarn Chain (ch) Mint 2orsted weight yarn Single Crochet (sc) H Crochet Hook Scissors Gauge Tapestry Needle 5 sts. : 1 inch 5 rows : 1 inch Case Bottom Chain 13 1. Sc into second ch from hook, sc next 9, sc 3 into last ch, sc 10 into the opposite side of the foundation ch, 2 sc into last space. 2.-16. Sc around Fasten off leaving long thread -- will be used to attach to case top. Case Top Chain 13 1. Sc into second ch from hook, sc next 9, sc 3 into last ch, sc 10 into the opposite side of the foundation ch, 2 sc into last space. 2.-8. Sc around Fasten off Bow Chain 21 1. Turn, and sc into the second ch from hook. Sc across. 2.-14. Ch 1, turn, sc across. Fasten off any loose ends. Now cinch the middle of the bow and wrap a long piece of yarn around it several times. Secure loose strand in the back with a knot. Assembly Whip stitch Case Bottom and Case Top together. Start from the side, stitch together around the back, and fasten of on the other side. This should leave you with a flap to slip your phone into and ability to fold the top over your phone. Next, attach the middle of the bow centered on the back of the case. Then secure four corners of the bow to the four corners of the case. Voila! You're done and have a new and CUTE cell phone case. *I'm sure my phone is a little smaller (4.5" x 2.5") than many of your iphones or other androids, but the pattern can be easily adjusted. Add or subtract stitches and rows as needed.
18 Comments
8/6/2016 11:56:48 am
All the contents you mentioned in post is too good and can be very useful. I will keep it in mind, thanks for sharing the information keep updating, looking forward for more posts.Thanks
Anna Belle
3/18/2017 09:00:15 pm
Is there a video tutorial available?
Anna
2/11/2018 08:47:14 pm
I wonder if this could be done in a round thus avoiding whip stitches. Thanks for posting this
Annissa
2/12/2018 07:16:37 am
Hi Anna,
Weezleton
10/9/2019 08:10:04 am
ssssssssssssssssssssssssuuuuuuuuuuuuuuuuuuuuuuuuuuuuuuuupppppppppppppppppppppppeeeeeeeeeeeeeeeeerrrrrrrrrrrrrrrrrrrrrcccccccccccccccccccccuuuuuuuuuuuuuuuuuuuuuuuuuttttttttttttttttttttteeeeeeeeeeeeeeeeeeeeeeeee!!!
Anonymous
2/12/2018 03:26:16 am
Thanks a lot for the pattern, but its not quite clear how to stitch the case top and case bottom together
Annissa
2/12/2018 07:22:50 am
Hi Anonymous,
Anonymous
2/12/2018 07:59:12 am
Thanks Annissa
Sabrina
3/3/2018 10:20:40 pm
I am just learning how to crochet and I'm confused on each step so I was wondering if you could video you making it or take a picture of you doing each step.
Erin Taylor
3/4/2018 09:19:11 am
when it says -16 does it mean decrease 16?
Annissa
3/5/2018 08:14:19 am
Hi Erin,
Mina
3/6/2018 12:04:37 am
What do you mean by sc next 9, sc 3 into last chain, and sc 10 into the opposite side of the foundation and sc 2 into last space?
Kayla
12/1/2018 10:36:44 pm
She means single crochet in the next 9 chain spaces. 3 single crochet into the very last chain on the foundation chain. Then instead of turning your work like you normally do continue to crochet into the foundation chain, but on the other side of it. So just step crocheting around and around.
Anonymous
6/3/2018 05:31:13 am
Can I sell the finished product?
Marie-Elena Baker
1/13/2019 04:29:16 pm
Really nice idea! Love how it slips in the back ! 3/15/2022 03:04:25 am
I very much appreciate it. Thank you for this excellent article. Keep posting!
Loti
4/12/2022 11:55:38 am
I made one - doesn’t look as nice as yours - but it’s OK 😆 Loved this pattern - great instructions! Thank you! 6/30/2023 07:21:41 am
En iyi amasya ilan sitesi burada. https://amasya.escorthun.com/ Leave a Reply. |
Author
My name is Annissa, owner of MissNissDesigns. I am a knitter, crocheter, sewer, and all around crafty lady. Archives
April 2023

|